Friday, February 13, 2015

Breaking Down the Daunting Kitchen To Do List Into Stages

I love the gray cabinets and wood shelves with simple brackets

Redoing our kitchen is very daunting to me and the prospect of actually doing it this year is scary and overwhelming.  It's not just putting in new cabinets and adding a dishwasher, I mean a wall is coming down and floors are being redone throughout the whole house.


I love the farmhouse sink and the butcher block countertops

So I decided to break it down into steps so I can take it on one part at a time.  I've also sprinkled some kitchen inspiration pictures courtesy of Pinterest throughout the post.


I love the colored dishes on open shelving popping off a white wall

Step 1: Reinforce the floor joists in the basement so the house doesn't shake as we walk through it anymore.  This connects to the kitchen for me because when we refinish the hardwoods as part of that project I'd like the floor to be all done and fixed.  This will hopefully happen in March as preliminary planning has begun.


I love the gray cabinets, farmhouse sink, and the warmth the wood brings to the room

Step 2: Take down the wall and put up the replacement beam to take the structural weight.  This is the part that scares me most out of all the steps.  Separating it from the kitchen being demo-d and not functional make it less stressful.  Also doing it first will help us to finalize the new kitchen layout before we even start the demo.  Until that wall is down there's some lingering questions about dimensions on that end of the kitchen that can't be answered till it is down and we know what we're dealing with.  Plus hopefully when it's down we'll be able to tell if there is original hardwood in the kitchen underneath the gross laminate flooring (FINGERS CROSSED!  I don't want to deal with it not being there).  Hopefully this project will happen in May.


I love that the backsplash goes up the ceiling and the open shelving
Step 3: Make a detailed budget and gather supplies.  I want to figure out all the little details, like how many sheets of drywall we need, how many can lights, how many tiles for the backsplash, which sink/dishwasher/exhaust fan/fridge we're buying etc and price it all out at a few different stores.  Then hopefully I'll be able to buy things as there are sales and coupons and know I'm getting exactly what we need at a good price.  I plan on buying things throughout the summer so when we demo in the Fall we have everything ready and waiting.


I love the exposed wood beams.  Now considering adding faux beams along the ceiling mimicking the actual structural beam

Step 4: DEMOLITION, BABY.  The most fun part of the process!  It doesn't take skill to pull out nails and knock out plaster.  The plan is to get to this point in the Fall and keep the kitchen as functional as possible for as long as possible.  We'll put the old cabinets in the basement or garage.


I love the dark wood and the subway tile

Step 5: Put it all back together.  Hopefully we won't hit any major delays (but I know we will) and this will only take a couple months.  This is the most exciting part: new functional cabinets, more counter space, A DISHWASHER, a nice big farmhouse sink, I CANNOT WAIT.


I love the bookshelf on the peninsula, and am wondering if we can have room for seating at our peninsula.  Also debating putting in a cookbook bookshelf or using some open shelving for mine

Step 6: Refinishing the original hardwoods for half the house.  This goes hand in hand with Step 5 since the floors need to be done before the cabinets can be put in.  If there are hardwoods in the kitchen we'll pull up the nasty laminate & carpet and have it all refinished (except the bedrooms so we can stash furniture in there, bedrooms will happen later).  Whether or not we rent a sander and do it ourselves or hire someone is still a topic of much debate in our house.


Love how the colored cabinet looks with the butcher block.  Also love the cupped handles

So the kitchen will pretty much be a year long blog topic as we tackle each step.  Hold me.

Wednesday, February 11, 2015

A New Exterior Light

Alternate title: Why Didn't I Do This A Long Time Ago

Seriously.  I don't understand why this wasn't on my Before the Wedding To Do List.  


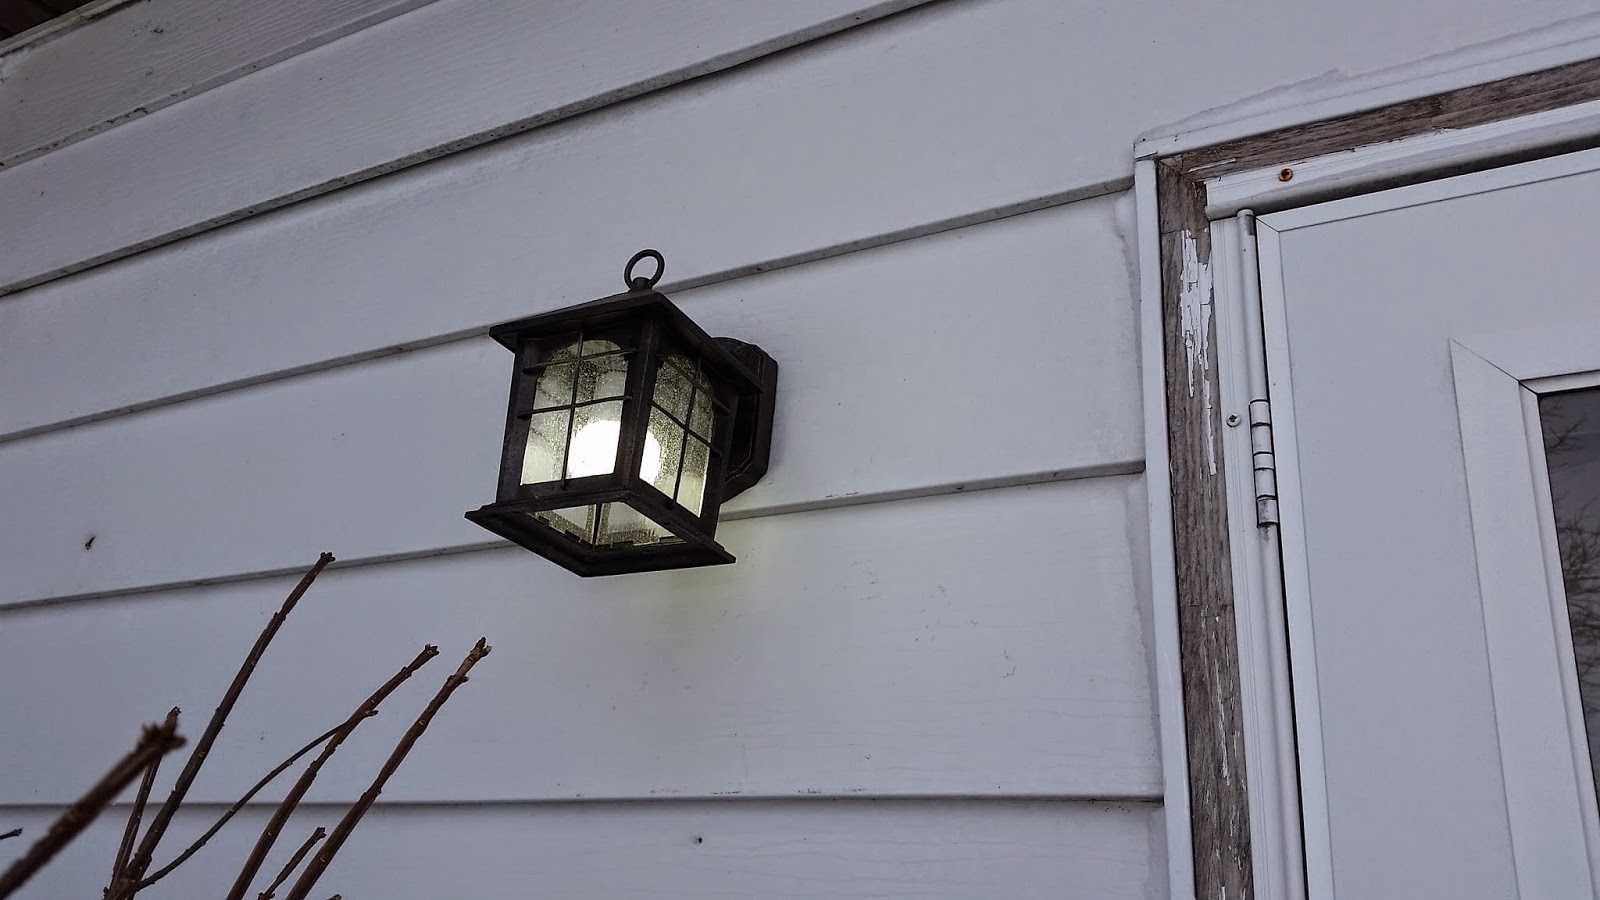
But this ugly tiny little "light fixture," if it can even be called that, that just held a bare bulb, has finally been replaced.

So after a little searching I found a nice fixture at Home Depot for $30.  I like that it looks like it could have been original to the home, and I'm hoping the seeded glass helps hide the light bulb a bit.  Plus it plays nicely with the light fixture on the porch (which is also from Home Depot and is their Hampton Bay brand).

Then my amazing Dad came over and installed it for me.


He had two furry assistants:


Taking out the old "fixture:"


Installing the plate for the new fixture:


I held the fixture up while my Dad connected the wires to the new light, so I couldn't take any pictures of that part.

Ta-Da!:


My Dad is a saint.  Look at the tight quarters he was working in:

That's like 4 inches between the bush and the house.  Plus he had his gloves off for this in frigid weather.  Dad, THANK YOU!

Before:

After:

And yes, we used one of our new LED lights!  And yes I can't wait to replace all the junky doors that go into the breezeway!


Also I'd like to wish a Happy Birthday to my wonderful Dad aka The Electrician :)

Monday, February 9, 2015

LED Lights

A couple of weeks ago Corey's parents found an AMAZING deal at Jewel on LED lights.  Yes, the grocery store.  It was a deal that made me think that it had to be too good to be true and that the lights must be junky.  But Corey looked them up on Amazon and they were being sold for $26 per bulb, but now the price went down to $14 per bulb.  

And Jewel was selling them on a buy 1 get 2 free deal!  And the 1 bulb only cost $6 for non-dimmable (and $8 for dimmable).  So that breaks down to $2 per bulb.  TWO DOLLARS FOR AN LED BULB. TWO.  I mean.......

All I can think of is that no one was buying them because they're a grocery store, so they put them on a big sale just to clear them out?????  It's too good of a deal to even question.


You may be wondering why we want LED bulbs so much.  Well, they last longer and use less power than even CFL bulbs.  Our LED bulbs are 9 watts, CFLs are about 13 and traditional bulbs are 60.  So there's a big difference in terms of power usage.  Supposedly these bulbs should last us 18 years before they burn out which is nuts.  One of our living room lights was 100 watts and now with all the living room lights replaced the entire living room doesn't even use 100 watts!

So Corey went to Jewel on his lunch break and bought a case.  Then he went back after work and bought another case for us and one for my brother.  In total he bought about 33 bulbs for us. 

And so far he has replaced 31 lights in our house.  I didn't even know we had 31 lights in our house!  Also if anyone wants a bunch of partially used CFLs, we can hook you up!

We immediately noticed the lighting change so Corey took a Before picture before he changed out the kitchen lights.

Before with our old CFL bulbs:

After with the new LED bulbs:

I can't get over how ORANGE the old lights were!

We bought some dimmable lights and some non so I don't know the full breakdown, but at a minimum we only spent $66 + tax for a houseful of LED lights.  Which is craaaaaazy.

The other upside to this is that now the house is so brightly lit that I am noticing how dreadfully bare our walls are and so now I am working on that.  In the coming weeks you should see lots of posts about art going up on the walls!

Friday, February 6, 2015

If You Don't Want A Traditional Wedding Registry


Continuing with Wednesday's Wedding Registry theme...
I did a lot of googling research for this part of my registry post and found so much good stuff that I had to break it off into its own post.  Also now I want to get remarried and do an "experiences" registry!

If You Don't Want A Registry:

As someone who held off on buying nice kitchen and household stuff and instead used thrift store finds & hand-me-downs from my mom all through college and for four years after, knowing that I'd put that stuff on my wedding registry one day, you have a problem that I don't understand, but I will try to help anyway.

People love you and want to give you presents when you get married.  Either give them a list of stuff you'd love to have, do a nontraditional registry, or get ready to get a bunch of random stuff and hope you like it or hope for gift receipts.


Nontraditional registry ideas:


1-3. Honeymoon- Use a site like buyourhoneymoon.com.  This is from their site: "Instead of bed sheets, have the first night of your stay in a luxury hotel; instead of a toaster, have breakfast watching the sun rise over the ocean."  Also Traveler's Joy is another honeymoon option that is free and so is Wanderable.  


It keeps things more personal so you feel like you're still buying someone a nice present and not just handing over cash.  Plus it makes the Thank Yous easier to write when you can specifically thank them for an experience on your honeymoon and tell them a little story about it.


4. Honeyfund Registry is along the same lines, but you can register for anything, not just a honeymoon.  Do you want a king sized bed or a real couch?  Do you want to save for a house instead?  What do you really want outside of the traditional housewares?


5. Hatch My House Registry- If you want to go the save for a down payment for a house route from above, this site is specifically meant for that.  You can also use it for renovations or big ticket house items.


6. REI Registry- If you're outdoorsy this could be the perfect registry for you!  Get all the gear for your next camping vacation as a married couple.


7. Etsy Wedding Registry- Maybe you don't want the traditional household stuff from Crate & Barrel and Target, but how about the more personal handmade things from Etsy?  You could pick out art for your home or handmade quilts, the options are endless with Etsy.


8. Green Bride Guide- This is a resource for all of your wedding planning and they do registries as well.  Similar to Etsy you can register for really special gifts, but all of these are "green" in one way or another.


9. Zola Registry- This site lets you do a lot of nontraditional registries all in one place, but the one that looks the best to me is the experiences one.  If you live in Chicago, LA, New York, or San Francisco you can get more local experiences.  But they have national ones too, like a meal delivery service, coffee subscription, cleaning service, cheese of the month club, custom art options, handyman services, and more!  You pick the experiences you want to have as a newly married couple and guests pick the ones they want to pay for you to do!  Pretty cool.


10. Newlywish- Like Zola this is a combo registry place: "Create a wedding registry filled with unique and stylish gifts from our 50+ boutiques of vibrant brands and artisans. Register for exciting experiences you can enjoy together, or add honeymoon and cash funds where guests can contribute to your future dreams"


11. Card Avenue-  This place lets you register for all sorts of gift cards!  Amazon, Home Depot, Target, even Visa gift cards.  So you can register for absolutely anything that you might need in the future!  This is so useful and spreads out the giving for a long time.  Anytime you think of something you need, go grab the gift card.


12. I Do Foundation- If you truly don't need or want anything, then use this opportunity to be generous!  Your family can give to your favorite charity in your name to celebrate your wedding.  They have a few different ways to set it up and you can read more on their website.  This way their wedding gift can be tax-deductible :)


Hopefully if you were very BUT I DON'T WANT A REGISTRY before you read this, you're changing your tune now!  Congratulations on your engagement and now please allow your loved ones to give you presents :)


Wednesday, February 4, 2015

What to Register For - Wedding Registry Tips

I know that there are lots and lots of articles & posts out there on this subject already, but I want to put my two cents in.  I am not telling you what objects you Have to Have, but I wanted to help by giving a framework for how to think about registering.


Tip #1: Register for what you know you'll use and not for what you hope you'll use. 

 You'll feel bad sending that still brand new, but now 5 years old, bread maker from your Aunt to Goodwill.  If you aren't one for hosting frequent fancy dinner parties, you're probably not going to use that China enough to warrant the money spent and the space taken up.  And if one day you are ready to make your own pasta, go buy an unwanted pasta maker from the thrift store!  Just be realistic when you pick.


Tip #2: If people are spending money on you, make it money well spent.

Pick out things you really like & need and will be happy to have.  As you use various things around the house you can remember who gave it to you and think of them fondly.  Also read Amazon reviews, and use a 2 week free trial of Cooks Illustrated's website to pick out the kitchen things so you're getting good stuff that will last.  You only get one wedding shower (season) so use it well!


Tip #3: Make sure you have things across all price points.

Some people who love you don't have a lot of money to show it right now, so make sure you have a good amount of stuff under and at $20 to balance out the more expensive stuff.


Tip #4: Don't add stuff just to add stuff.

If you're registering in a store don't let the salesperson talk into stuff you don't want.  And if you see the registry is pretty empty and you still have another shower, add some things you WANT, or add that 1 thing you thought might be too expensive, or add gift cards to different stores for stuff you think of later. Don't just add random junk that you don't like/love/need/want to fill up your house. Refer back to Tip #2.


Tip #5: Think outside the kitchen.

Maybe you are pretty set with kitchen stuff or you don't cook much or you need to add stuff to your registry.  Would it be nice to have new towels?  Or a second set of sheets so you can do laundry at your leisure like a queen?  Do you want that cute stuff (picture frames, pillows) at the end of the aisle in Target, but you have been trying to save money for the wedding?  Would you like matching bedside lamps for your bedroom like a grown up?  Want some nice soft blankets for the couch?  Really think about what would be nice to have in your home and go from there.


Tip #6: Read lots of articles titled "What I Wish I'd Registered For" 

This will give you tips on specific items that people love and will help you avoid other people's pitfalls.  I read so many of these and it helped a lot.  Don't register for everything they say, but pick the things from their lists that make sense for you.


Tip #7: Use a site like myregistry.com that allows you to register wherever you want all in one place

This is best for online shopping since you can't look at the registry in the store (but you can on your smart phone), which can be tricky for your older relatives.  But I did not want to be tied down to a couple of stores.  I wanted to get whatever was the best option, and not the version that Bed Bath & Beyond sells or whatever.  Anything that is online can be added to your registry, which includes websites for artists you love or Etsy (though I learned in my research for Friday's post that Etsy now has a wedding registry option).  For example, I discovered that Kmart actually has the best towels.  They're egyptian cotton, crazy soft & fluffy, have beautiful color options, and are only $13.  But that's all I wanted from Kmart so it wouldn't make sense to do a registry there.  But with myregistry.com I could do whatever I wanted!


Tip #8: Don't be a douche who registers for stuff and then returns it for cash.

You are terrible and don't understand the point of helping a couple to start their home together.  If you don't want the typical housewares stuff please read Friday's post and register the classy way.


I hope this helps!  Congratulations on your engagement!

Monday, February 2, 2015

Once Upon A Time

Once upon a time I was an architecture major at the University of Illinois.  Once upon a time I loved the two years of Technical & Architectural Drafting that I took in high school.  Once upon a time I had a blast at my architecture summer camp at U of I in high school.  Once upon a time I loved my first semester of architecture studio in college.

By some fluke that semester the license that we needed for the design software was messed up by someone somewhere.  So they didn't have the licenses needed for the freshman class to use the computers in studio.  Normally the first semester students spent half of studio hand drafting and the other half on the computers.  So they were scrambling to come up with more hand drafting projects for us and planned on switching up the second semester studio to give us more computer time to make up for it.

It was around this time that I had a terrifying realization:

What I loved about architecture was the hand drafting, and while we were going to get a solid foundation in school, in the real workplace world it was going to be all on the computer.

I loved spending the year designing a home in my high school class.  We hand drafted, computer drafted, and built a real 3D model of our planned house at the end of the year.

I loved spending a week (two weeks? my memory is fuzzy) at U of I one summer in high school building a real 3D model of the modern beach house I designed.

And I wanted to be an architect who designed houses.  Not office buildings, stores, theaters, or modern city living blocks (stores on the bottom!  apartments on top!  rooftop gardens!  cities of the future!).  And I knew for the next six years (architecture requires a two year masters) I'd be spending an awful lot of time designing projects and having them critiqued for a grade.  And they would hardly ever be homes so I wouldn't care that much.  Plus WOULD I be able to get a job at a firm that primarily designed homes???

So the end of my first semester freshman year I kind of freaked out.  Ever since 8th grade I had decided I would be an architect and now I wasn't going to be one and I Didn't Have A Plan. AH.  Though the fun part was registering for classes for second semester with no major.  I just took what interested me: sign language, child psychology, astronomy, foundations of education, ceramics, literature of global culture, and piano lessons

That semester I thought a lot and I realized that two of the classes I had taken completely voluntarily were specifically required of education majors.  Huh.  I had been babysitting ever since my mom let me and I loved working with kids.  When I was a kid I wanted to be a teacher.  My two best friends were teachers (or were going to be).  Elementary Education does involve a lot of hand drawing and creativity which was what I loved about architecture.  Suddenly I had a New Plan.  I took summer school every summer and caught up and graduated on time even with a major change and a semester abroad in New Zealand.  I loved my student teaching SO MUCH.  It was perfect and I was so ready for my own classroom.  I filled out over forty applications and wrote a million essays for them.  And I got a job as an assistant. Sigh.

My elementary education plan hasn't fully panned out because it is frustratingly hard to get a teaching job.  But I have hopes of getting a really cool job in a different part of the teaching world soon.  Fingers crossed!

But anyway, (I like reminiscing, you may have noticed) I am telling you all of this because I thought it might be fun to provide some context for all of my dreaming & scheming for the house.

Once upon a time we were going to buy land and build our own house (my architectural dream come true), but my then-fiancee and I realized after lots of land-hunting, that it was cheaper to buy a fixer upper house because it already came with big expenses like land, a well, and a septic system.  

This house was a dream come true.  It had really good bones from the 1920s, meaning it was well-built back in the "good old days when things were done right," but modern enough that a lot of the building standard sizes were the same as today which makes it a bit easier to deal with when remodeling.

As much as I wish it had really cool original 1920s built-ins, I secretly love that it doesn't and that I get to put them in myself.  This house is a pretty blank slate and it is so very fun for me to design the details.

So that's my little out of the blue rambling story to help explain how I come up with my grand visions for this house and why I love doing it all.

Friday, January 30, 2015

Dreaming & Scheming - The Built-Ins Part 3


My last set of built-in ideas (that's a lie already, I just realized I haven't included the dining room window bench) is in the dining room.  As I mentioned in Wednesday's Dreaming & Scheming post I want to put built-ins on either side of the big doorway between the living and dining rooms.

The dining room built-ins will be to display nice servingware and glassware on the top and for hidden away storage on the bottom cabinets.  I'm thinking our board games will go in those cabinets.  

It would be really nice to have glass doors on the top to display the servingware while keeping dust at bay, but we'll see if that seems within reach when the day comes where this project tops the list.

Here is my trusty Paint picture to set the scene:


I think building the living room bookcase will be a good trial run for these and maybe after building it we'll feel like glass doors are a realistic challenge.

With these built-ins, plus the buffet, plus all our expanded kitchen cabinetry we will have plenty of room for kitchen stuff even in a small house.  I can't wait!