Pages

Friday, December 27, 2013

Weird Paint Jobs

Buying a foreclosed house means that you don't know much about your house's history. But from looking around our house I know one thing, the previous owners weren't the best painters. Here, let me show you:

I get not wanting to paint the 9 foot ceiling awkward nook by the bathroom & attic, but couldn't you at least paint a straight line where you stop?


A roller is really all you need. Brushes are overrated.


You know, if the bed is there is there a point to painting behind it?


The wall, trim, crown moulding, ceiling, & doors are all painted the exact same flat paint in this bedroom. 


Test paint patch (same color as the dining room) that never got painted over


This is a nice effort, but the stripes are a little much for me.

Thursday, December 26, 2013

Weekend Update #10


This is a late update, we didn't even go last weekend because of Christmas parties, this all happened the weekend before last. These updates take forever and life got crazy.

This Last Last Weekend We:
  • got the mower bed off the tractor & put on the snow plow (with 2 extra people helping)
  • partially plowed the driveway
  • worked on the tractor (the control for changing the direction of the snow blower broke)
  • shoveled the walkway
  • sanded & painted the linen closet drawer fronts & painted the drawer insides
  • started stripping the paint off the window & trim in the bathroom (3 coats of stripper wasn't enough, hopefully 2 more will do it)
  • completed more steps towards getting the ceiling lights working again (getting power to the ceiling lights up in the attic is much easier than getting power down to the light switches)
  • installed the toilet paper holder & hand towel ring
  • pulled up some of the carpet in Bedroom #2 to see a big piece of the wood flooring
  • used our BRAND NEW STOVE/OVEN!
  • found a delicious new way to reheat pizza (toast in a frying pan with some oil with a lid or a piece of foil on top, then the crust gets pan fried and it is amaaaaaazing)
  • had people over for social reasons for the first time!
Here's the mower bed off of the tractor:

And the tractor with the snow plow on:

Toilet paper holder!:


After 3 coats of stripper you can start to see the wood. There's a LOT of paint on this window:

There are lights in the kitchen!:

A peek at the wood floors hidden under our gross carpet. Once we finish the kitchen & master bedroom we will refinish these beauties:


Sunday, December 8, 2013

Weekend Update #9


This Weekend We:

  • saw the house covered in snow for the first time!
  • borrowed a truck & moved a new-to-us futon into the living room
  • tried to sand the linen cabinet drawers & realized a different type of sander would be better for me to use
  • put new handles on all 4 doors for the linen cabinet, replacing the old latches that didn't really work
  • mopped the bathroom floor & got off the paint drips from painting the cabinet last weekend
  • put up the shower curtain rod & hung the shower curtain & liner
  • replaced the back door lock
  • ran the Romex cables from the basement up to the attic as Step 1 of a seemingly endless amount of steps to get power back to the ceiling lights (that used to be powered by the knob & tube that we removed)
We didn't get as much done this weekend as usual because of moving the futon in, but it's nice to start to have real furniture in there instead of just camping chairs!

The Romex comes from the box, goes up the stairs and

And runs up the stairwell in the attic and 
runs across the floor to the 1st floor ceiling lights


New futon!

New shower curtain!
New handles!
They used to have latches that didn't work very well

Friday, December 6, 2013

The Bathroom To Do List


Thankfully with a little shopping I can cross off a big chunk of this list. I hope to be done with the bathroom by January, except for maybe the art part because I want to take my time with that.
  • replace the piping with PEX tubing
  • replace the drains
  • take down shower doors & caulking
  • patch walls where doors left gouges
  • paint bathroom walls
  • paint linen cabinet & drawers
  • power-sand drawer fronts to get old handle marks off
  • wax the drawers so they slide better & re-install all the handles
  • buy a shower curtain rod
  • install shower curtain rod & hang up shower curtains
  • buy a shower curtain
  • buy a shower curtain liner
  • buy & install the toilet paper holder
  • buy & install the hand towel ring
  • buy & install 2 short towel bars on the side of the linen cabinet?
  • buy a garbage can
  • buy a stainless steel shower caddy
  • buy toothbrush holders for the medicine cabinet
  • buy a floor mat & hand towel
  • make a little decorative curtain for the window, somewhere between this and this, but I think with a little tension rod instead of a wood block thing
  • reglaze the cast iron tub
  • recaulk the tub, tile, window crack, & sink edges
  • make/buy art to hang up
  • take down the grody hooks from the back of the door
  • fix, strip paint off of, & stain the door
  • strip paint off of window, window trim, & the door trim
  • stain the window & window trim
  • repaint the door trim & floor trim?

Thankfully I am very happy with the toilet, sink, faucet, medicine cabinet, & tile that are already there.  Once we reglaze the tub I'm happy to let the bathroom go without major rehab for many, many years. With all the other major renovations we have planned, I'm glad that the bathroom just needs some cosmetic changes & a few additions (new paint, towel bars, toilet paper holder etc).

I don't think the linen closet will be there for the long haul, though. After getting intimately familiar with it last weekend I know that the fresh coat of paint didn't fully hide all the chips & paint drops from previous paint jobs. And with the condition of the cabinet I'm not up for all the work it'll take to strip off the paint & repaint. I think in a few years (5??) we will knock it down & rebuild something in the same footprint that has drawers that slide better, adjustable shelves, & a much better paint job.

Wednesday, December 4, 2013

Spring Project Goals


This Spring we want to:
  • take off the snow plow and put the mowing deck on the tractor
  • replace the basement windows & turn the old coal chute into a window
  • replace the broken living room window
  • strip the paint off the front door, stain it, and put on the new door knocker
  • completely rework the front porch (this is the Big Project for my 9 days of Spring Break)
  • spray paint (with ORB [oil rubbed bronze] spray paint) the front railings
  • spray paint the mailbox to match the railings, fix the mailbox post
  • plant everywhere! Let there be garden beds all around the house! Let there be a living privacy fence!
  • put grass seed all around the well head & the north side of the garage where ComEd messed it all up
  • powerwash the house
  • wash the windows
  • regravel the driveway (this might not happen but I really want it to)
Then we'll move in, get married, and get going on our Dreaming & Scheming projects!


Monday, December 2, 2013

Winter Project Goals


This Winter I want to finish up as many inside projects as we can before Spring comes and we have to get planting. Here's the list:
  • take off the mowing deck and put the snow plow on the tractor
  • change the lock on the back door
  • finish up the bathroom (I have a whole separate list & post for that coming Friday)
  • fix & paint the ceilings in the bathroom, dining room, living room, craft room & bedroom #1 
  • paint the walls in the bathroomdining room, living room, craft room, & bedroom #1
  • probably paint the floor trim & door trim in all the rooms (but not the window trim or the doors themselves)
  • strip the paint off the doors to the bathroom & bedrooms #1 & #2 and then stain them (they are painted white on the bathroom & bedroom sides)
  • put new handles on the doors when we rehang them
  • finish updating the electrical supply to all the outlets and the ceiling lights

That should hold us through March!  We'll revisit this post when Spring comes and see how we did.


The house from the South

Sunday, December 1, 2013

Weekend Update #8


This Weekend We:

  • emptied & set new mouse traps 
  • rehung the bathroom light & switchplate
  • washed the linen cabinet & drawers to get ready for painting
  • painted 2 coats inside the cabinet & 1 coat on the outside
  • realized the cabinet drawer fronts need to be power sanded before I can paint them (the imprint from the old handle is more stubborn than I originally thought)
  • painted test swatches on the dining room, living room, craft room & Bedroom #1 walls
  • vacuumed some of the attic
  • emptied out the Shop Vac twice (dear god, THE HORROR)
  • built a sawhorse
  • fixed 3 gutter elbows
  • winterized the gas in the tractor
  • walked the perimeter of our property for the first time
  • put a new outlet in Bedroom #1 that actually tightly holds plugs in it (before they would fall out at the slightest touch)
The vacuumed & unvacuumed attic floor. Dramatic difference, much?:


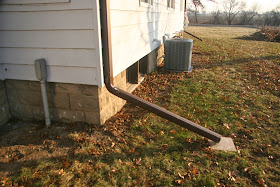
 A lot of our gutter elbows are crushed for some reason, like this:

The fixed ones now look like this & now drain normally:

Our house from the back end of our property:


This was a very crisply satisfying project:

 I wasn't a fan of any of the choices for the living room. They were either too bright (even though the two on the left are lighter colors there is a blinding brightness to them) or too dark. So back to the drawing board for this room. From left to right the colors are Surf n' Turf, Copper Patina, & Nimbus Gray:

I do like Nimbus Gray in the craft room, however. It looks much lighter in there. Probably because of all the windows and the south light. Top Left is Surf n' Turf, Top Right is Copper Patina, & the bottom is Nimbus Gray:

I love the Deep Ocean (darker blue) in the Dining Room for the back of the future built-ins, but I am undecided about the Ocean Breeze (lighter blue). I can't decide if it is too bright and too much of a baby boy's room blue or not:
The top ones have primer underneath and the bottom ones do not
I forgot to take a picture of the Bedroom #1 walls once it dried and before it got dark. But, I do love how it looks! Here, you can see the colors on the paint sticks. Bright & Early is for the bedroom walls & Kensington Blue is for accents in the room:

I did a whole post on Paint Colors already, click here to see it.

Later this week I will post my Winter Project Goals and my Spring Project Goals so check back!

Monday, November 25, 2013

Dreaming & Scheming: The Guest Bedroom


Once we recover from the second major renovation (adding a second bathroom & a master suite), I want to tackle getting the house back up to three bedrooms. At first I thought of using the attic space since it is pretty tall already and takes up the same floor space of the entire first floor, but it would involve putting in big shed dormers (pictured here) on the east & west sides of the house and therefore pretty much need us to restructure the entire roof. That sounded veeeeery expensive and would involve us waiting a long time while we saved up the money for that kind of renovation. Plus the spiral staircase that I envisioned took up the only space where a fireplace could go.

So the night that I spent alone in the house taking down all of the HVAC ducts in the basement I started thinking about the basement more and more. After all it is also very tall (8 feet for a basement isn't too shabby), and now that we moved the furnace to the other room and all the vents came down it is getting easier to picture us using that space.

I had already asked my Dad if it was possible for us to finish the basement (add drywall, flooring & all that jazz) at some point and he said yes. And so suddenly the idea of finishing a basement seemed much more appealing than redoing our entire roof. So now the plan is to make the storage room (with the attic & garage I don't think storage space will be an issue) into a bedroom and my Dad even had the brilliant idea to make the old coal chute into a second window for the room! Plus it's on the west side of the house so it'll get that beautiful light in there. We plan on redoing all the basement windows in the Spring so that's when we'll turn the chute into a window.


We will also finish the giant room in the basement that is under the dining and living rooms while we're at it (the utility room will stay unfinished). I imagine it'll be some combination of family room/play room/pottery studio. We will also have to redo the stairs and somehow close up the creepy crawlspaces next to them (but have access hatches??), because I want people feeling comfortable down there, not creeped out. I love my parents' basement guest room because it is totally refinished and feels like a normal room, plus it's always cold! (I can't sleep when it's hot, I like it cold.cold.cold while I sleep).


And at this point those are the only (only!) major renovations we have planned! In between those big projects we'll work on smaller things like living room & dining room built-in bookcases and the built-in desks & storage for the Craft Room, plus random outdoor projects (chicken coop!).  Stay tuned!

Monday, November 18, 2013

Weekend Update #7

T'was a stormy weekend, but I still loved the west view

This Weekend We:

  • finally got to see all the work that was does on the house 11/4-11/6 (new: furnace, air conditioner, duct work, water heater, sump pump drain) 
  • explored the Habitat for Humanity ReStore (I foresee us getting many project supplies there in the future)
  • painted 2 coats of paint in the bathroom!!!
  • put on the last kitchen cabinet handle
  • attempted to grind off the adhesive on the concrete in the Breezeway, but decided to try this method
  • worked on a temporary fix of a bad gutter situation
  • measured the basement windows (to get a cost estimate done for replacing them in the spring)
  • measured the whole house to make a floor plan (and maybe even a 3D model) on Sketch Up
  • "emptied" mouse traps -yuck- and set new ones
  • scraped away some of the kitchen wall "texture"
  • dealt with a mysterious fly convention in the garage (why were there suddenly a 100 flies in there????)
  • vacuumed the basement
  • washed the kitchen floor twice (probably needed a third but the smell of Mr. Clean Gain was starting to give me a headache)
  • washed bathroom light fixture
  • frosted the garage & bathroom windows
  • labeled our tools (getting hard to tell which ones are my Dad's & which ones are ours)
  • washed bathroom floor
The New Utility Room From Left to Right: the (not currently hooked up) water softener, new water heater, new furnace, and the dehumidifier


New View from the bottom of the basement stairs:

And the Old View:

The new vents for the basement, I've never seen them look like fire alarms before?

There are new holes in the wall to let through the only vents that run perpendicular to the joists. Luckily Corey can walk under them. This is the view from inside the future guest room:

And this is the view from the utility room:

Evidence of why we need to fix one of the gutters can be seen to your left

This is the new sump pump drain. Now it drains to outside instead of the septic system:

It used to be very gnarly and look like this:

And continued all the way over by the stairs!

Now it drains to right here, but I want to have it be a little longer to get the water away from the window:

And while we're there, here's the new AC unit a few feet over:


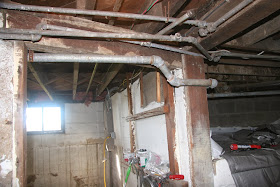
Here's the big pile of old iron pipes that have now been replaced with PEX tubing:

There are two new holes in the wall in the basement stairwell to access the bathroom plumbing:


And now we are all prepped for a washing machine in the laundry room/pantry area:

And now the most fun part, NEW BATHROOM PAINT!:


We frosted the bathroom window since I'm not a big fan of blinds. We also frosted the garage window (this way we get light while not showing off what tools we have):


Now that the bathroom walls are painted I'm itching to paint the linen closet & ceiling. So stay tuned!